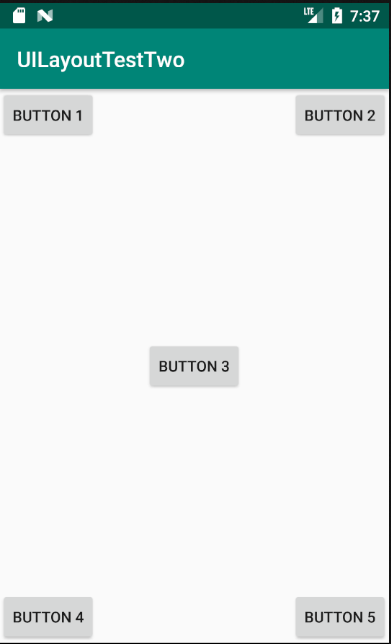
这是一个非常常用的布局,可以通过相对定位的方式让控件出现在布局的任何位置。新建 UILayoutTestTwo 工程,修改 activity_main.xml 中的代码:
1
2
3
4
5
6
7
8
9
10
11
12
13
14
15
16
17
18
19
20
21
22
23
24
25
26
27
28
29
30
31
32
33
34
35
36
37
38
39
40
41
42
43
44
45
| <?xml version="1.0" encoding="utf-8"?>
<RelativeLayout xmlns:android="http://schemas.android.com/apk/res/android"
android:layout_width="match_parent"
android:layout_height="match_parent">
<Button
android:id="@+id/button_one"
android:layout_width="wrap_content"
android:layout_height="wrap_content"
android:layout_alignParentLeft="true"
android:layout_alignParentTop="true"
android:text="button 1"/>
<Button
android:id="@+id/button_two"
android:layout_width="wrap_content"
android:layout_height="wrap_content"
android:layout_alignParentRight="true"
android:layout_alignParentTop="true"
android:text="button 2"/>
<Button
android:id="@+id/button_three"
android:layout_width="wrap_content"
android:layout_height="wrap_content"
android:layout_centerInParent="true"
android:text="button 3"/>
<Button
android:id="@+id/button_four"
android:layout_width="wrap_content"
android:layout_height="wrap_content"
android:layout_alignParentLeft="true"
android:layout_alignParentBottom="true"
android:text="button 4"/>
<Button
android:id="@+id/button_five"
android:layout_width="wrap_content"
android:layout_height="wrap_content"
android:layout_alignParentRight="true"
android:layout_alignParentBottom="true"
android:text="button 5"/>
</RelativeLayout>
|
运行程序,效果如下图:
以上代码不做过多解释。上面的控件定位是依靠父布局的,其实RelativeLayout中还可以依靠控件进行定位。修改activity_main.xml中的代码:
1
2
3
4
5
6
7
8
9
10
11
12
13
14
15
16
17
18
19
20
21
22
23
24
25
26
27
28
29
30
31
32
33
34
35
36
37
38
39
40
41
42
43
44
45
| <?xml version="1.0" encoding="utf-8"?>
<RelativeLayout xmlns:android="http://schemas.android.com/apk/res/android"
android:layout_width="match_parent"
android:layout_height="match_parent">
<Button
android:id="@+id/button_three"
android:layout_width="wrap_content"
android:layout_height="wrap_content"
android:layout_centerInParent="true"
android:text="button 3"/>
<Button
android:id="@+id/button_one"
android:layout_width="wrap_content"
android:layout_height="wrap_content"
android:layout_above="@+id/button_three"
android:layout_toLeftOf="@+id/button_three"
android:text="button 1"/>
<Button
android:id="@+id/button_two"
android:layout_width="wrap_content"
android:layout_height="wrap_content"
android:layout_above="@+id/button_three"
android:layout_toRightOf="@+id/button_three"
android:text="button 2"/>
<Button
android:id="@+id/button_four"
android:layout_width="wrap_content"
android:layout_height="wrap_content"
android:layout_below="@+id/button_three"
android:layout_toLeftOf="@+id/button_three"
android:text="button 4"/>
<Button
android:id="@+id/button_five"
android:layout_width="wrap_content"
android:layout_height="wrap_content"
android:layout_below="@+id/button_three"
android:layout_toRightOf="@+id/button_three"
android:text="button 5"/>
</RelativeLayout>
|
运行程序,效果如图所示:

RelativeLayout的属性除了上面提到的,还有很多其他的,以后的学习中遇到了,可以多积累。下面是一些属性的简要说明:
原文链接:
https://www.cnblogs.com/AleiCui/p/11826141.html
 微信
微信 支付宝
支付宝